You can save money on a metal detector by combining a portable radio and a few other components. This is particularly cost-effective if you can use a portable transistor radio that you already have lying around.
A metal detector can be made from a radio and a few other parts that you might have lying around. These systems work because they can produce electromagnetic fields that are either enhanced or reduced by conductors like metals.
Here you will find out what parts you need to build a metal detector from a portable transistor radio. Some of these design schemes are quite simple, with one method involving only a radio and a calculator. You will also have opportunities to build your own PCB board with a DIY kit.
How Do I Make A Metal Detector With A Radio?
There are a couple of different methods for making a metal detector from a radio. One method will be much more advanced, while the other method can be a neat project to introduce you to metal detectors.
The Quick & Easy Method
This will require very few tools and little know-how about electronic components. All you need is a radio, a cheap calculator and electrical tape.
- Find an AM/FM radio that works and a small plastic calculator
- Adjust the frequency of the radio by turning it as far to the right as you can (High AM/FM station numbers)
- Adjust the volume so that all you can hear is static
- Turn on the calculator and place it against the back of the radio
- Move the calculator around until the static tone becomes more constant
- Tape the radio and calculator together
The More Effective Method
A more effective design schematic involves constructing a metal detector that is similar in structure to the metal detectors you can buy. These types of detectors will ultimately be a more affordable option, provided that you take the time to learn how to build the system.
These metal detectors will involve constructing:
- A search coil to find metal parts underground
- Electronics connecting the search coil to a portable transistor radio
- A PCB board to hold the electronics
Further below, you will find instructions on how to piece together this metal detector using a radio. You have a little bit of freedom as far as the design schematic goes, but you will want to make sure that the electronic parts such as the resistors and transistors. Luckily, you do have the option of buying a DIY soldering kit that will make the job a little easier.
Why You Can Make a Metal Detector From a Radio
A lot of people are incredulous when they are told that they can make a metal detector from a radio. Although they serve very different purposes, radios and metal detectors do indeed share many of the same components. This is a relatively straightforward DIY process.
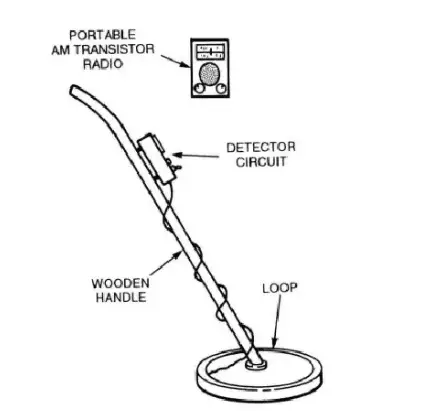
Any metal detector will have to consist of the following parts: a large coil of wire and a collection of electronics. The coil of wire will be used to make the round end of the metal detector that is pointed towards the search area. Hence, this part is called the “search coil.” The electronics will signal the presence of a metal object.
Metal detectors work by producing an electromagnetic field via an electric part called an oscillator. Insulators such as dry rocks do not make an appreciable change to the electric field, but conductors (such as metals) will cause the electromagnetic field to become either enhanced or reduced.
You will need at least three different radios for you to be able to extract the necessary components from the radio. At least one of these radios will need to be working so that you can use the amplifier to power the speaker.
You will extract the following parts from the radios:
- Transistor
- This component is responsible for amplifying signals and switching voltages on and off
- Tuning capacitor
- This is the dial or knob on the radio
- Resistor(s)
- Oscillators
What Tools Will I Need?

The tools that you will need will depend upon the complexity of the design. At the very least, you will need tape to connect different components. You will also need a board made out of plastic, wood, or another rigid material if you are going to construct a search coil that will detect metal buried underground.
The simplest type of metal sector calls for:
- Portable Transistor Radio
- Needs to be battery-powered
- CalculatorÂ
- Also needs to be battery-powered, not solar-powered
- Tape
More complex designs call for:
- Wood or plastic board
- Copper Wiring(enameled)
- At least 1 Portable Transistor Radio
- PCB Board (if you are going to build a circuit board)
- Soldering Kit (for building circuit board)
You can even buy metal detector soldering kits like the one found here. This will make it easier to have all the necessary electrical components together for your project. You would still need to buy a soldering kit and AM portable radio separately, but you wouldn’t have to worry about having the right parts to make the circuit board.
A Single Transistor Circuit Is The Simplest Design
There are many different methods for constructing a metal detector at home. The simplest design plans call for the construction of a single transistor circuit. This circuit allows you to salvage a used portable transistor radio like this one.
The reason that this works is this:
- The AM receiver detects two resonant-frequency signals
- If these two signals are less than a few kHz (kilohertz) apart, then an audio tone can be heard
Resonant-frequency oscillators are the most basic type of metal detector because it only makes use of one search coil for detection purposes. For this reason, it is also the most affordable metal detecting technology b, making it practical in DIY projects.
In a single transistor circuit, only one resonant-frequency oscillator needs to be used.
- An AM broadcast station produces one of the RF (resonant-frequency) signals
- The portable transistor radio receives the two signals and outputs a sound
Summary of Construction
- Turns of copper wire are wound on a rigid material
- This can be wood or plastic
- Keep the winding turns in position with tape
- The mixing and sound amplification duties are handled by the transistor radio
In the following sections, there will be more detailed instructions on how the individual components of the metal detector are constructed. Further below, you will also find out that you can find metal detector soldering kits that will make your job much easier.
Digging Deeper: Metal Detector Frequency – Explained
Constructing The Search Coil
The first step will involve constructing the search coil. This is the substitute for the little round part at the end of metal detectors that is responsible for discerning conductors and insulators. The parts that actually produce the sound will be constructed next.
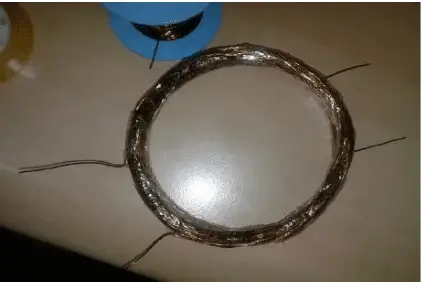
You will start out by cutting out a wooden former for the search coil, according to these directions. A “former” is the part that will house the search coil. The instructions here call for the former to be a piece of wood that has been cut out to 30 cm in diameter.
- Next, you will draw a large circle on the block of wood using a pencil and a compass.
- There is no specific requirement as far as the size of the circle.
- However, a bigger circle will be able to scan for metal to a greater depth underground.
- There is no specific requirement as far as the size of the circle.
- Draw a smaller circle inside this circle, be sure to leave a gap of 2-3 inches between the circle
Use a saw to cut out the circle. A bandsaw works well for this if you have access to one. You will end by wrapping copper wire around the circumference of the circle. Instructions will vary by source, but these instructions call for 20 turns of enameled copper wire. The wire should be wrapped against the wood board as tightly as possible.
Optional Step: Add a Faraday Shield
Adding a Faraday Shield to your DIY metal detector will make the unit as a whole more effective, but this additional step is optional. While it will make your metal detector more efficient, you also need to balance out costs. One of the main points of the DIY project is to save costs.
A Faraday Shield is a device that helps reduce the ground-effect frequency-shift issue. This issue arises because a metal detector scans the ground in a position that is parallel to the ground. This has a tendency to shift the frequency of the oscillator.
Materials Needed:
- Aluminum Foil
- Scissors
- Bare wire
- Glue
Start out by cutting the aluminum foil into a piece that is 3 inches wide and long enough to cover nearly the entire circumference of the search coil. Be sure to leave at least 1-2 inches of bare space along the circumference of the search coil. Then add a length of the 4 inches of bare wire at one end, underneath the aluminum foil.
Then glue the shield in place. Ensure that the glue dries out properly by placing the entire search coil on a flat surface and then covering it with a heavy object like a book. Leave at least an hour for the glue to dry out. After the glue has dried, you will connect the other end of the 4-inch bare wire to the loop’s ground-end connection.
Making The Non-Metal Handle
You will be using two different oscillators to mark the detection of metal. One of these will come from radios. One of these will be placed at the search coil with the other on the end of a wooden handle.
If you are going to construct a handle to hold the metal detector, then the handle needs to be made out of a non-metal material. This is because the frequency transmitted by the oscillator increases when it is anywhere near a metal piece. Using a metal support handle will defeat the purpose of having the detector in the first place.
Suitable candidates for handle materials include:
- Wood boards
- Broom handles, plastic or wood
- Polycarbonate Tubing/similar plastic tubing
The wooden/plastic handle should be constructed in such a manner that it is comfortable for use. There are no specific requirements as far as dimensions, although you will need to keep in mind the fact that you will have to mount the radio oscillator in a place that is convenient for wiring.
The wooden handle will be connected to the center of the search coil loop. There are no requirements as far as which materials or methods you use to attach the handle to the search coil. Tape is a simple and effective way to attach the wood handle to the search coil.
Electronics Should Be Built & Stored In Airtight Containers

You are encouraged to build the electronics in airtight containers and keep them stored in these containers. This will help ensure that damage from moisture and dust will not occur. You don’t have to get too fancy; you can use airtight plastic food containers like these to store the parts of the metal detector. You can place the battery in one container and the electronics in the other.
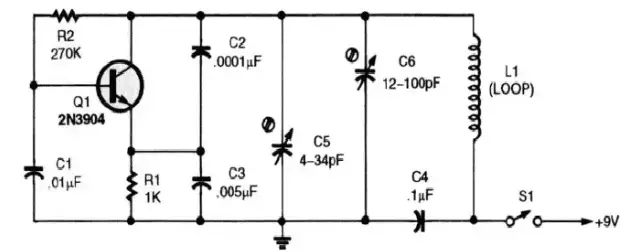
How To Build Search Coil Electronics
You will build an oscillator for the electronics part of the search coil. The terminology sounds pretty complex, but an oscillator is simply a device that produces an electromagnetic field. It is an electric circuit that is capable of being rapidly switched on and off, making it an effective component for separating out conductors and inductors.
The oscillator can be built using a transistor and a few resistors. A radio already has all these electric components connected together to form a circuit. A normal metal detector only uses one oscillator, but this DIY will need to make use of two different oscillators to detect a change in the note when metal is detected.
Connecting The Metal Detector Electronics Together
The task of connecting the metal detector electronics together will require you to know how to build and connect a circuit. You will use wire and metal soldering to make these connections. If you do not already have a soldering kit, you can easily find kits online, as is the case with the Anbes Soldering Iron Kit.
For the circuit board, you are encouraged to use a plastic sheet like the one found here.
- Drill holes in the location where the component wires will be placed
- Connect electric component ends using the soldering iron
- The wiring will be placed underneath the homemade board
- Place the electronics in a waterproof box
How Do I Put Together a Circuit Board For a Metal Detector?
As was stated earlier, putting together the electrical components of the metal detector does require some knowledge of soldering and electronics. If you are a novice at putting together electronics, you need not be discouraged from building a DIY metal detector.
You can find guided resources online for building metal detector electronics.
Here are some tips on how to put together the circuit board and electronic parts of the metal detector:
- Look for a basic circuit diagram like the one found in this manual.
- This explains how the switch closes and current flows through the circuit.
- The circuit needs to be constructed in a manner similar to that in the diagram so that it can oscillate at the resonant frequency
- Start out by mounting the transistor to the circuit board
- The components will be mounted according to a design schematic of the PC board
- Then insert the ends of the search coil into the PC circuit board
How To Use a Metal Detector
In order to use the metal detector, you will connect the radio to the battery. Then you will adjust the volume control to the speaker amp. Continue to adjust the volume knob until you can hear a note coming from the speaker.
You will be able to tell when the metal detector has encountered a piece of metal buried underground. The note from the speaker should remain in a constant state until metal is detected. Any change in note will indicate a spot where metal is buried underground.
Make The Process Easier With A Metal Detector Soldering Kit
Connecting the electronics together is perhaps the most difficult part of putting together a DIY metal detector with a radio. This process requires you to know a bit about building an electric circuit and also requires you to consider the layout of the components carefully.
This task can be made much simpler with this Metal Detector Soldering Kit.
The kit includes the following electronic components:
- Compact carrying case
- Soldering iron
- Desoldering pump
- 5 multiple soldering tips
- Tin wire tube
- Soldering iron stand
- Anti-static tweezers
- Wire stripper cutter
- 2 electronic wires
If you place an AM radio near the oscillator, it should emit an audible tone when the unit is near metal. You will need a file or razor blade to strip away the enamel from the wire when necessary.
Even if you have a plan for exactly how you would like to design your DIY metal detector kit, you can still benefit from the metal detector soldering kit. This kit comes with a number of useful components at a low price, including a PCB board, wire, and several electrical components.
How Big Should The Search Coil Be On A Metal Detector?
A larger search coil will allow you to detect metals at a further depth, with a few notable caveats. You should size your search coil based on what type of materials you are looking for. Otherwise, you may build a metal detector in a way that is inefficient, spending more money on materials than you need to. These guidelines have been adapted from research performed at the University of Khartoum.
Mini-Coils/Snipers
The smallest that you can make a search coil and still have it be effective at least for some purposes is around 5 inches in diameter. They work well to distinguish metal pieces from other materials in an area with a lot of debris, such as a junkyard. They will not service most general metal detecting activities, such as looking for metal pieces buried at the park.
Small Search Coils
Search coils that are 5-8 inches in diameter are used to identify metal in areas with a lot of other debris and also areas with heavy vegetation or rough terrains. Search coils of this size are preferred amongst those looking for something portable. Unfortunately, they are still small enough to be limited in how far underground they can go actually to detect metal.
Medium Search Coils
Search coils that are from 8-11.5 inches diameter present themselves as sort of a jack-of-all-trades when it comes to usefulness. These types of coils will be suitable for general purposes, like detecting metals buried under a park or at the beach. This would be a good target size range for your DIY metal detector.
Large Search Coils
Search coils are considered large when they are 11.5-24 inches in diameter. There is a little bit of a misconception that larger search coils will always yield better results. This search coil signal may not go as deep underground as you would think if you are operating in areas with a high degree of mineralization in the soil. They can also be slightly more difficult and expensive to build than the medium-sized search coil.
Large search coils will be a good choice for you if you are planning the following kinds of activities:
- Finding coin caches
- Looking for artifacts/other deeply-buried relics
- Searching a large area like a farm field or pasture in a shorter amount of time
Digging Deeper: How Search Coils Work
What is The Easiest Metal Detector To Make?
The more complex designs listed above aren’t ideal for someone who doesn’t have any experience soldering and putting together circuits. The metal detector soldering kit will teach you how to do this, provided that the soldering gear must be bought separately.
The simplest metal detector to make follows a design schematic in which a calculator and portable radio are used to make a metal detector. You will use a portable radio with a battery, like the DreamSky Pocket Radio. You will also need a calculator with a battery, such as the Texas Instruments TI-30Xa. The calculator needs to be battery-powered, not solar, for this to work.
The most basic design scheme involves simply taping the radio and the calculator together. Before taping the radio and calculator together, switch the radio to the AM band and tune it to the right until you only hear static and not any music.
Then you will:
- Align the battery compartments of each device until they are back to back
- Turn the calculator on
- Find a metal object to test the metal detector out
- You should notice a change in the static sound that sounds almost like a beeping noise
- If you do not hear the beep, adjust the position of the calculator until you do
You can make this metal detector easier to handle by adding a wooden or plastic rod and taping the calculator and portable radio back to back to the rod. This will make it easier to move the metal detector around.
This calculator and radio metal detector will be adequate for identifying large metal objects, but you will most likely not be able to detect small items like coins under the ground. This is because there is no copper wire search coil added to this design schematic.
If you want a detector with a little bit more strength, you are encouraged to try building a detector that has a copper wire search coil attached, as is discussed in this article. The standard search coil is about 8-11 inches in diameter. This should be a size that is large enough to detect most metal objects underground and near the surface.
Conclusion – How to Make a Metal Detector With a Radio
Now you have everything you need to know so that you can make your own metal detector at home out of a radio. I hope you enjoyed this article and if you have any questions or comments please leave them below. Until next time Happy Treasure Hunting!
